QuTiP on Anaconda on Bash on Ubuntu on Windows
22 Aug 2016This post covers:
- Installing Ubuntu on Windows.
- Installing Ubuntu packages.
- Installing Anaconda Python for Linux in Ubuntu on Windows.
- Installing QuTiP in Ubuntu on Windows.
Introduction
Recently, Microsoft introduced Bash on Ubuntu on Windows, a full Ubuntu stack running on the Windows kernel instead of the Linux kernel. This opens an opportunity for scientific computing, as it allows for Windows users to run the same version of powerful tools such as Python as Linux users. While at first blush, installing Ubuntu on Windows seems like massive overkill, it goes a long way towards improving interoperability and accessibility for scientific computing on Windows. Moreover, Ubuntu on Windows is much lighter-weight than running a full virtual machine, and can easily interoperate with native Windows software by sharing common file systems. Using Ubuntu on Windows can also help lower the barrier to entry for a full Ubuntu Linux stack by making it much easier to learn and experiment with Linux software.
That said, Bash on Ubuntu on Windows is still a very new tool, and has a few limitations that can cause problems. In particular, Bash on Ubuntu on Windows only works on Windows 10 Anniversary Update (launched August 2016). In this post, I’ll detail how to get up and running with Bash on Ubuntu on Windows, using the example of the QuTiP library for quantum information.
In particular, this post proceeds in four parts, each concerning how to install a different part of the full stack, along with some background on what each different layer provides. As a result, this post runs a bit long. That said, the actual steps are fairly straightforward.
What is Ubuntu on Windows?
First, however, it helps to delve a little bit into what exactly Bash on Ubuntu on Windows is. Largely, Bash on Ubuntu on Windows is a complete installation of the Ubuntu Linux distribution, but running on the new Windows Subsystem for Linux (WSL) instead of Linux itself. WSL works by translating Linux operating system features into their equivalents under Windows, such that software designed for Linux can be run on WSL without modification. In particular, the Bash command-line that ships with Ubuntu works wonderfully on WSL, and forms the basis for Bash on Ubuntu on Windows.
For more detail, Microsoft’s WSL blog has a very nice introduction to the architecture underlying Ubuntu on Windows.
Installing Windows Subsystem for Linux
Since the Windows Subsystem for Linux is still in beta, we have to jump through a few hoops to enable WSL. Thankfully, these steps only need to be done once, and then we’ll have a working Ubuntu install that we can use for whatever additional software packages we like. Microsoft has provided a very complete guide to installing WSL; here, we’ll briefly summarize those instructions.
First, it is critical that your Windows 10 installation is fully up to date, and is running Anniversary Update. To check, go to Settings → System → About, and check that the build number is at least 14393. If you are running an earlier version of Windows 10, you can normally update to Anniversary Update by using Settings → Update and security → Windows Update to check for updates. Alternatively, you can manually upgrade to Anniversary Update by using the installer provided by Microsoft.
Once that’s done, we can enable beta features in Windows. This requires turning on Developer Mode under Settings → Update and Security → For developers. Ensure that the Developer Mode option is checked here; this may require rebooting. Next, if you aren’t already a member of the Windows Insider Program, you’ll need to join with your Microsoft account.
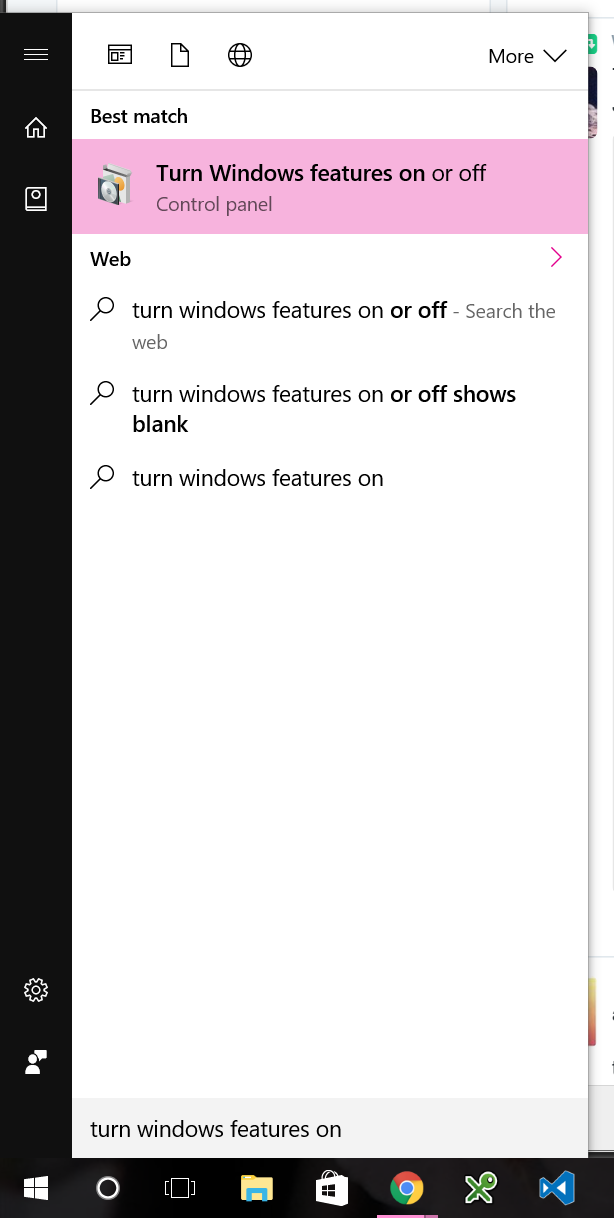
Now that we have access to beta features, we can enable Windows Subsystem for Linux. Press the Start button, and search for “Turn Windows features on or off.” From that dialog, check the box next to Windows Subsystem for Linux (Beta) and press OK. This will reboot your computer and install WSL.
Finally, we can install Ubuntu on Windows by running one last command. From the Start menu, run PowerShell, then type and run the following command:
PS> bash
You will be prompted to install Ubuntu on Windows, and to create a new user account for Ubuntu. This need not match your Windows account, as it exists only within your Ubuntu installation.
Installing Ubuntu Packages
Once we have WSL and Ubuntu on Windows installed, we can easily use Ubuntu’s built-in package manager to quickly add additional tools. In particular, QuTiP compiles code on the fly to help improve performance, such that we’ll need to install a compiler toolchain. Ubuntu uses the powerful apt program to manage software installations.
To install packages, first run Bash on Ubuntu on Windows from the Start Menu to bring up the Bash command line.
![]()
We will need GCC and GFortran, the C and Fortran compilers that come with Ubuntu. We’ll also install Git, as this will make it easy to later install pre-release versions of QuTiP. Finally, we also install the lsb package, which provides the Linux Standards Base expected by many common Linux software packages. We can install all four packages with the following command:
$ sudo apt-get install gcc gfortran git lsb
Breaking this down a bit, sudo causes the rest of the command to be run as the root user. In Ubuntu on Windows, this is the root user for your Ubuntu installation. Since WSL installs a separate copy of Ubuntu on Windows for each Windows user, the root Ubuntu user only has access to the resource your Windows account can access.
The rest of the command tells apt to install the aforementioned four packages, along with any other packages that they require. It should take just a few minutes to download and install everything.
Installing Anaconda
The next step is to install the Anaconda distribution of Python, as Anaconda provides a wide range of cutting-edge Python packages for scientific computing. This is not strictly required, as Ubuntu on Windows does ship with a perfectly fine Python installation.
That said, here I’ll focus on installing Anaconda 4.1.1 for Python 3.5; later versions can be found from Continuum Analytics as they are released. Importantly, we will be using the 64-bit Linux version of Anaconda. The Windows Subsystem for Linux allows us to run the Linux version from within Bash on Ubuntu on Windows.
We’ll use the wget command that comes with Ubuntu to download Anaconda. From Bash on Ubuntu on Windows, run the following command:
$ wget http://repo.continuum.io/archive/Anaconda3-4.1.1-Linux-x86_64.sh
Once this is done, we can run the Anaconda installer:
$ bash Anaconda3-4.1.1-Linux-x86_64.sh
The Anaconda installer will ask a sequence of questions. We’ll want the default answer (press ENTER) on each question but the last one:
Do you wish the installer to prepend the Anaconda3 install location
to PATH in your /home/cgranade/.bashrc ? [yes|no]
[no] >>>
Type yes and press ENTER. Anaconda is now installed into Ubuntu on Windows. Quit and relaunch Bash for the changes to take effect. To confirm, run which python to see which version of Python will be run by Bash. You should see something like /home/cgranade/anaconda3/bin/python.
By default, Anaconda will use the Intel Math Kernel Library (MKL) to accelerate numeric computation in Python. Unfortunately, MKL is not yet fully compatible with WSL, so we’ll need to disable some MKL features. As reported by Evfro, MKL for WSL is incompatable with a feature known as kernel thread affinity, so we’ll disable that feature now.
$ printf "set KMP_AFFINITY=disabled\nexport KMP_AFFINITY" >> ~/.bashrc
$ source ~/.bashrc
Now that Anaconda is installed, we can use Python, IPython, and other powerful tools from within Ubuntu on Windows. In particular, we can use Jupyter Notebook by using the command
$ jupyter notebook --no-browser
This will start a server at http://localhost:8888 that can be used from your favorite browser on Windows. When you’re done, press Ctrl-C from within Bash on Ubuntu on Windows to stop the Notebook server.
Installing QuTiP
We’re almost there, as we now have installed Ubuntu on Windows, a compiler toolchain, and the Anaconda distribution. We’ll finish up by installing QuTiP itself. With everything else in place, this is quite straightforward. Anaconda ships with pip, an installer for Python packages.
$ pip install qutip
If you would prefer to install the latest development version, you can specify the QuTiP Git repository instead:
$ pip install git+https://github.com/qutip/qutip.git
In either case, QuTiP ships with a wide variety of tests that can be used to ensure that the install worked properly. We can run these using the qutip.testing.run() function:
$ ipython
Python 3.5.2 |Anaconda custom (64-bit)| (default, Jul  2 2016, 17:53:06)
Type "copyright", "credits" or "license" for more information.

IPython 4.2.0 -- An enhanced Interactive Python.
?         -> Introduction and overview of IPython's features.
%quickref -> Quick reference.
help      -> Python's own help system.
object?   -> Details about 'object', use 'object??' for extra details.

In [1]: import qutip.testing

In [2]: qutip.testing.run()
Depending on your system, these tests should take from ten to forty minutes to run. If all goes well, they should complete without any errors (some warnings and debug messages are normal, though), indicating that the install was successful and that you’re up and running with QuTiP. Enjoy!